Archive | Word Art RSS feed for this section

Need a favor from you all!! Great gift idea!!

11 Aug

I had the pleasure of connecting with a very talented graphic artist.

The name of her business is Modern Typography.

I did a formal review for her on the Simply Stacie Blog.

I am posting today to give you a closer look at the family tree I have created out of the print I received for my review.

For my review, I got to choose my own print to have personalized.

Imagine Modern Typography‘s surprise when I wrote and asked if could be personalized with 7 kids.

Her sample was for a nice small family.

She worked on it and gave me many options.

This was my order and I was very, very happy with it!

She personalizes everything to suit your needs.  You can even choose your own quote or scripture.

 Look at the extra freebies she enclosed!  Such cute things~!

Now you know I love paper and I am always making something.

I know that tree would have been fine as is…but something in me just can’t leave well enough alone.

So I took some things from my August Tally Kit, came up with this lovely piece of art.

The Kit is called BEAUTIFUL SOUL and you can still get one of these kits HERE for $21.00.

 I just love the way this turned out!  How bout you?

Imagine making something like this for a newly married couple and leaving the branches blank to fill in along the way.

 Or what about a gift for a grandma with all her grandchildren listed?

So many ideas I could come up with.

 I used many Cheery Lynn Design dies on this, so I do have to make a plug for them also!

I would love for you to visit her ETSY store.

http://www.etsy.com/shop/ModernTypography

Please do consider her and use her for any gift occasions you have coming up!  Really, I think her things are fantastic and very unique!  Perfect for so many occasions!

Visit her and like her on FACEBOOK to keep up on what she is doing.

https://www.facebook.com/moderntypographyblog

Also, go on over to the Simply Stacie blog and get in on the giveaway, I am hoping there is someone out there who will not want to wait for the giveaway to be over and purchase something now…so there you have it..my hope for the day!

 Here is the review and giveaway link for the Simply Stacie blog:

 http://www.simplystacie.net/2011/07/modern-typography-review-giveaway-us-can/

Remember to let Modern Typography know that Jeannie sent you over!

Have a great day and happy shopping!!!

Paper Issues Blog Hop and my Top Secret Project reveal

19 Mar

Thank you for joining me on this special day, Paper Issues 1st Blog Hop.

We are starting our new challenge over on the Blog.  This challenge starts today, and goes through April 2, 2011.

The theme of the challenge is My Favorite Things.

Here was the teaser I gave of my project.

The digital layout shown below, I had previously done and focuses on things I adore.

It includes a couple of my favorite scrappy things, polka dots being my all time favorite thing in the world.

The other must have,favorite thing, for my paper crafting is bright, bold colors.

In my opinion, no one does bright and bold better than October Afternoon.

I am crazy about EVERYTHING they make!

My current favorite line, an older line of theirs, is Cheery Hill.

Ooh, just looking at it makes my happy.

Lastly, since I was about 17 or so, I have just been the BIGGEST FAN, EVER, of Mary Engelbreit.

She is one of My Favorite Things!

I have combined most of My Favorite Things into today’s project.

Without further ado, I give you my bottle cap wall hanging.

This is made from the Cherry Hill line.

I took a lot of pictures trying to capture all the detail I put into this, but I thought it might be a bit much to list each picture.

So I made this photo collage on PHOTOVISI, free.

I will show a couple of my favorite pictures to explain the detail.

You can see I used one of my favorite Mary Engelbreit phrases.

“Bloom where you are planted”

I made my tiny banners from the CHEERY LYNN PENNANT die.

Yes, I made all the adorable details on the pennants.

I spiraled tiny shreds of paper for my cheery and flower leaves.

See those little paper beads?  I lifted that idea of my good friend Jamie Lynn Cripps over on BITS OF PAPER.

Here is the link to her flower, that features these beads.  Go HERE.

She also has a freebie Word Art download I used for part of the “BLOOM” phrase.

The flowers and apples I have done are a special technique I do, maybe I will have to do my own tutorial on them;)

I love to use bits and pieces of paper that have the brand names in them.

Can you see part of OCTOBER AFTERNOON’s name in the flower petals?

Love it!

Here is a last side view to see all the wonderful layering and detail.

To get an idea of how small this project is, here are some pictures of my little one with it in her hands.

She is 4, small & petite, so you can hopefully get a feel for the scale of this project.

Now, I just need to keep her from wanting to hold it and squish them apples!!

Thank you for getting through this post with me.  Talking about My Favorite things is easy to do I have learned.

Now on with the BLOG HOP.

Some of the DT girls have some RAK’s, so be sure to visit all the participating blogs.

Our fearless leader has this kit for ONE lucky blog hopper!


Paper Issues Blog Hop Giveaway

The Requirements to win this are pretty simple:

“Don’t forget Paper Issues is also providing a wonderful box full of Crate Paper goodies to the lucky reader who links up a FAVORITE THINGS project,

follows this site or friends us on Facebook starting Saturday, the 19th of March, and each of you will get you an extra entry.”

The Hop starts at the PAPER ISSUES HOME blog.  Go there if you get lost at all!!

http://paperissues.blogspot.com/

From my BLOG, you will hop on over to:

Jocelyn Petcholan www.scrappinmeme.blogspot.com


Have a great day and thanks for joining all of us!

Fridays with Cheery Lynn Designs

25 Feb
I sure do hope some have come by today to see the full project that I gave you all a teaser for last week. Remember that tiny picture I shared? Here it is again.

Well, before I share the rest of this project with you, let me share a card I have made with the little Veggies again. Do you know how versatile these dies are? With a little imagination, these dies can be use for really ANY occasion.

Here is one of the Peas decked out like a Cowboy or would that be a Cowpea?


Over on the Cheery Lynn Design Blog, we have been trying to WOW you with the Cheery Lynn Designs Embossing Plates.  I have used quite a few on this card. 

I started by cutting my card with

Circle – Scalloped LG Stackers Nesting Dies

Then I embossed the circle with the RODEO embossing plate.

 Because I was using the Core d’ nations cardstock, I was able to lightly sand the card front for the embossing pattern to appear.


Do you like all the dangling tags, they are all different branding iron images.

They are from the embossing plate called RANCH BRANDS/COWBOY BOOTS & HAT.

The boots and hat on the PEA are from the same plate, other side, it is a two sided plate.

 Also, the rope the tags are dangling from are from the same plate.  A very versatile plate, if you ask me!

Other products used on this card are OPTIMISTIC 1/2 inch Font set, MOUNTAINS BORDER DIE, and the GALLOPING HORSE die.

I am not a horse person, but hey, I can make a horse person card, any ole’ day!
Now, on to where my comfort zone is!
  
Cuteness, rhinestones and my kids!

The little teaser last week was a portion of this picture.

My little one LOVES Madame Blueberry!

It was my little one’s 4th birthday not too long ago. I was at Old Navy and found this very inexpensive skirt and clearance.

 It was purple and white stripped. I immediately saw(in my head) Madame Blueberry on there and had to get it for my daughter.

I found a plain white shirt to go along with it, here is the Birthday girl modeling her outfit for you.


She just loves her new outfit! It is truly a one of a kind outfit!

Here is a close up of Madame Blueberry on the skirt.

Oh, yes, she is QUITE the princess!

I used a high grade felt for most of Madame Blueberry’s pieces. I used individual rhinestones to write the word PRINCESS above Madame Blueberry’s head.

Now, remember, if you are going to go get some stones, you have to check out Rhinestone Hues on Etsy!


My last tip is that I used a mixture of a high grade fabric glue and Heat n’ Bond to attach things to the clothing. For my machine appliqueing, I used a clear nylon thread!


Hope you have enjoyed this project, imagine all the things you can make using your dies as fabric appliques.


I am sure to have something fun to share next week, so come back and see!  I love to hear from you so please leave me a comments, especially if there is something you’d like to see or know how to do that I have not covered!

TA TA FOR NOW!! This has been Jeannie from The Polka Cabana.

Is it Tuesday?

11 Jan

Yes, it is Tuesday.  For me a bittersweet Tuesday.  Last week at this time, I had no idea that today I would be telling so many of you goodbye.  Due to life circumstances, I have had to say goodbye to many of the Teams I have been designing for over the last few months.  I am especially sad to say goodbye to my lovely friends at Tuesday Trio and my Groovy Friends at If It’s Groovy.  It seems that this can be a tough job to have when the craft and the passion behind the reason we craft is not fully understood or supported by those around you. 

So, I need to step back, regroup and figure out how to be a mom, a wife and still craft and hope that someday, I can figure how to profit from this love of mine so it does not appear to be such a waste of time:)

So today, I will share first my project I have designed for one of teams I am not saying Goodbye to.  That would be, Cheery Lynn Designs.  Tuesday’s are always my post day with them so here is what I have made.  We had a theme to follow this week, that theme was using the colors, red, black and white only.  This was tough, I kept thinking of certain things and thought, “nope, that has pink, nope that’d require green.”  I wanted to be very careful not to bend the rules, I am weird like that!

Here is my card:

Here is the inside:  (hmmmm, I wonder who I could give this to?)


I did not use a lot of dies on this.  Actually I only used one set.  The set is called Little Stackers Scalloped Oval.  My idea to use only one set was purposeful.  I wanted to show that you can still have a core set of dies.  You do not have to have 30 sets(OH BUT THAT’D BE FUN!) to be able to have fun with your dies.  I took 2 larger dies and created this framed window that reveals the beautiful Digi Stamp by Therese Travis.  Inside when you open the card you can see the full beauty that awaits for the lucky recipient on the inside of this card.

Cheery Lynn Designs still has their BLOG CANDY giveaway going. 

 Stop by the BLOG to see the details.  So, at least for Cheery Lynn Designs, I will be back next week.


Now onto my sad farewell.  Tuesday Trio.  I have loved being part of this time.  It filled me with such joy to come together with women from different countries as we supported one another and created together.  I will miss the challenges and I will miss the Tuesday sketches and my Tuesday posts for them. 

Tuesday Trio’s new sketch going up today.  We are on sketch #49.  This is the last sketch I am playing along with as a designer.


My interpretation of the sketch went something like this:  I turned the sketch upside down…..

….and here is my project.  This is especially dedicated to not only Tuesday Trio, but all the teams I have had to say goodbye to. 

Thank you for allowing me to work with your designs, your products. 

 This is truly what I love doing in life and I will miss you all.

The most important blog post EVER!!

14 Dec

I really hope I have not used that Title before, because, truly this is my most important post yet.  I have been waiting awhile to post this.  Ever since September of this year.

Right around the time when I was VERY new to blogging, I was able to attend a women’s conference called Time Out for Women.  It took place in Sacramento on Friday September 10 and 11th, 2010.   It was and incredible experience.  I was able to go with my Mother and Sister in-laws and some other wonderful friends of theirs.

One of the speakers, Jill Manning, tackled a very difficult topic.  One that we all want to pretend will just go away on its own.

Her presentation was titled, “The Uncensored Truth About Pornography”   Why this topic?  Jill says, “Because women are impacted by pornography in unique and profound ways, we play an indispensable role in the fight against it.  Although the statistics are daunting, we know that pornography cannot win, in light of Who and what is on our side.”

She shared some disturbing statistics about the age at which children are first introduced to this topic, and sadly most images are seen within their own home.  Thanks to technology, our children will see images of things that we never came across when we were kids.  Moms and Dads, the internet IS NOT A SAFE PLACE.  No filter is fool-proof and even sites geared towards children still need to be monitored.  We would not let our toddler who has had one day of swimming instruction swim in the Pacific by themselves.

So, why would we let a child go on the internet unmonitored while they are still young and innocent?

Jill shared a remarkable story of elephants living in the wild.  Elephants roam in packs.  Did you know that when you see images of those packs, that all those elephants you see are females and their young?

Male elephants are solitary animals and only join a pack during mating season, and then they go back to their solitary roaming.

Now, who is considered the King of the Jungle?  Well it is the lion.  No animal would dare go up against the lion, because they are strong, and will over power any animal it targets as its prey.

There is one animal that the lion can not go up against.  That animal?  The elephant.

Here is why:


Do you notice anything here?  When there is danger, the momma elephants form a circle.  This circle in impenetrable. Inside their circle is where they keep those that are most precious to them, their young.

I have to tell you, to just look at those images, brings tears to my eyes.

At the end of Jill’s presentation she compared us to the elephants.  She reminded us that we WOMEN had the power to form an impenetrable safety shield for our children.  We are the matriarchs, it is our duty.

At the close of Jill’  presentation, I have to say, I was moved and I did feel empowered, thinking that if all the women took a stand against this, we could really make a difference.

We were all given a printed card that was a card to take home, go over with our families and children and take an oath to make good choices, while online, while watching TV, etc.

Most of you know, I have a lot of kids, 7 to be exact.  I took one look at that 5 x 7 card and thought there is not enough room for all us to sign.

So, I  made my own version and have used the exact same wording that was on the CLEAN & SAFE MEDIA PLEDGE, that was given to all 2,400 of us matriarchs there.

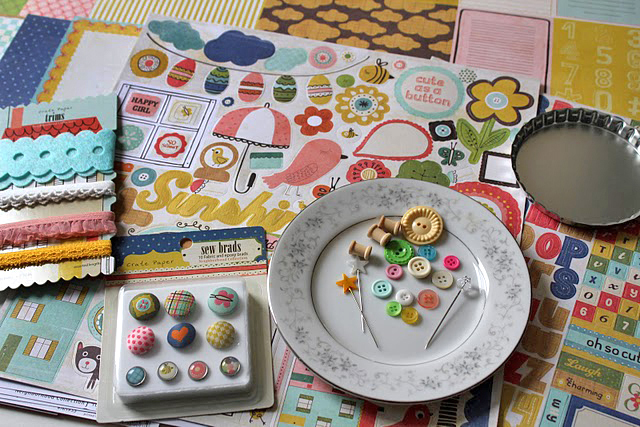
My design in based on the free tote bag that, again, all of us attendees were given.


I took one look at that bag and knew, that was a layout waiting to happen.

Being that I was so inspired to do something about this pledge, I have come up with some ideas.

I want to challenge any of you to take the PLEDGE with your families too.

I would love for you to create something beautiful to spotlight this in your homes.  Hang it on your wall, in a frame next to all your home computers.

Talk about this with your families and take this wonderful pledge.  Can you imagine if every one of my blog visitors took my challenge and then referred a friend her to take the challenge also?

I am so passionate about this that for EVERYONE that links up a project to this post, I will tally all of you up and create and send you a blank THANK YOU card based on the design I used for my CLEAN & SAFE MEDIA PLEDGE.

So, you will be rewarded by me for putting this pledge into your home.

I have many friends from all faiths, but I plead with you to look past the small differences that our religions may have.

When it comes to our children and our families, churches and religions and individual beliefs we stand UNITED.

So please join with me and share this with friends and family.

Print that pledge out and make something beautiful for your home with it!!

If anyone has any questions about the pledge, just let me know!

Thank you to GROOVY DEB at If It’s Groovy for posting this project today.

Hope you all like what I have done.


The PLEDGE is done on a transparency sheet.

The saying on the BLUE says:

“BE WHERE YOU ARE, WHILE YOU’RE THERE”

I thought that was perfect for this.  To me, this from means, be constantly on guard and not to let our defenses down.

The phrase is WORD ART Created by Bethany Harty, the QUEEN of Word Art!

Her Blog:

http://elegantwordart2.blogspot.com/

She has AMAZING things!!

I was able to find an awesome frame at Michael’s, for $3.00, WOW!!

All the blue birds, are done with a FISKARS punch I won from entering a FISKATEER contest.

On each bird, you will find, every one of our my family’s signatures, that we agree to take the MEDIA PLEDGE!

There are 9 birds…9 of us agree to “keep our home a happy and healthy place to be.” (Wording taken from the PLEDGE)

Now, to be eligible to receive the FREE handmade card from me, I ask a couple of things:

1) Go leave a comment at If It’s Groovy

2)  Go and get a COPY of the Pledge here: http://deseretbook.com/files/family_mediapledge.pdf

3) Create something, anything.  Even if you just print it and frame it, I will accept it.

4) Take a picture of your creation.

5) Blog about this with your creation

6) Linky up to the MR. LINKY below

7) Follow My Blog and If It’s Groovy

Now that might seem like a lot, but I AM GIVING YOU SOMETHING IN RETURN!

If I have to make 100 cards, it will be the best thing and the hardest work for something important and so worth it to me.  I will also have a Permanent Gallery here on my blog for any and all submissions I receive.  I truly hope it will be a HUGE Gallery.  This is for the best cause, your family and your children.

Refer someone here and you both give me each others name, you get an additional prize.

The MR. LINKY is open until January 15th, 2011.  Enough time to get through the holidays, refer friends and get your Pledge creation done.

I hope that all who stop by will link up with me and that we all can make a difference in this world, one family at a time.

Powered by Linky Tools

Click here to enter your link and view this Linky Tools list…

One picture, SO MANY OPTIONS!!

24 Nov

Another of my top 10 people who have inspired me and has had a great impact on me is Therese Travis.  Therese’s Design Team for PAPER FACES DESIGNS, was the very 1st team I wan invited(or allowed) to be on.  I am proud to say I am still with her and she will have a hard time getting rid of me:)

The other day, I shared with you the tutorial of how to create a card with a Digital stamp and Digital Papers.  Todays techniques have some same steps, but are different in many ways.  To view the tutorial on Digital Stamps with Digital Papers you can click here to view the post.

Today, I am using Therse’s Angel Miriam.  You can purchase Miriam for your own personal use here.  I will show you how to use a .svg file and also how to use Miriam as a DIGI STAMP for 3 beautiful cards.

For my.svg card, I am using a version that Therese created for me so that I can cut it out on my Cricut.

You will start with your file opened up in your cutting software.

Please note, I have warped the pattern to hopefully protect Therese’s image. 🙂  The image will open up all grouped together.

My next step is to discard what I won’t use.  Or to be safe HIDE what you do not need and at this point, I group them on my mat how I want them to cut.

I am pretty picky about trying to save paper.  So I go with the minimum of paper I can go with to cut my files.  You can see on the next image, I have divided the pieces up into what color I will cut them out on.

Next I measure my colored paper out to fit the image on my template and adhere the paper to the cutting mat. That is the next image you are seeing.

Next you will see my pieces are cut and ready to go!  Yes, I warped the picture again:)

Jeannie tip here…When working with certain files, such as Therese’s Fairies, angels, or anything with faces or cirles etc, as I am removing them from the cutting mat, I turn them over and put a small dot on the TOP so I know which is the top and the bottom.  Might sound silly, but it has really helped in my assembling process.

I have gathered all the supplies to complete this card.  In one place..it helps the picture taking process tremendously!!

It is always important to add some depth to you pieces by sponging them with a neutral color.

My next step is to emboss my background and assemble my word art on cardstock.  I sponge these with a dark color and edge with a gold stamp pad.

Here is Miriam all assembled and ready for her card.

Time for the bow.  I use an empty cup and tie a knot on the cup.

I then cut the ribbon on the opposite side of where I just tied my nice knot.

At this point I have a for tailed ribbon, take the ends that you cut and adhere them around an attach behind your card with tape.

At this point, I forgot I needed to mat Miriam with white paper, so find a scrap and “bubble cut” around her.

Next, put dimensional adhesive on the back of Miriam and the word art.

Assemble the rest of the items and that is how I use an .svg file.

Here is a comparison with a card that I did with the DIGI stamp and colored cardstock.  I love the way it looks..but with the .svg file, the CRICUT does the cutting, with the DIGI, I do the cutting.

I also tried a different techiique I can show you later if anyone is intrested.  It uses the DIGI stamp also.  Here is the final product.

Here are the TRIO.  Which do you like best?

Your favorite will be my FREEBIE today..that one lucky winner will receive.  To qualify for the freebie..here are my terms:

Please visit THERESE and if you do let her know that Jeannie sent you over!

Leave a comment and on next WEDNESDAY’s post, I will announce the winner!  Send you friend over and they mention your name..you get an EXTRA ENTRY!

  • Leave a comment = One Entry
  • Send a Friend = One Entry
  • Follow my Blog = One Entry
  • Visit THERESE and leave a comment = One Entry
  • Fiskateer’s post your Fiskateer Number in comment = One Entry
  • Co-Design Team Member of mine, on any team = One Entry  Just mention which DESIGN TEAM we are together on!

Be sure to let me know HOW MANY entries you qualify for and what card technique is your favorite.

The others will go on Etsy, and I will take special orders for these, if you need more than one.

Can you believe the art of Therese?

Lastly I leave you with a card and a scrapbook page made from another one of Therese’s lovely drawings.

CARD

SCRAPBOOK PAGE

I hope you liked this tutorial.  Let me know if there you have an intrest to see the other technique I used on the 3rd card.

I want to thank Therese Travis of http://www.etsy.com/shop/paperfacesdesigns for allowing me to use ANGEL MIRIAM  in this project.

Visit http://tuesdaytrio.blogspot.com/ to see what the sketch and challenge are for this weeks challenge.  Here is what I did with Theres’s Angel Cherie.  Let me know how you like her also.


Wow, what a post, right??

Another GIVEAWAY! Everyone wins!!!

18 Oct

Ok readers!  I am here to share some things again!

I will post the winner of the ABC creation in a later post today..but for now let’s look at some more of THE LOLLIPOP PRESS’s fabulous kits!

This one is ONE of my favorites.  It is called BFF!


These kits will be available for purchase as soon as the GRAND OPENING happens.  For now, I am lucky enough to play with the kits.  The perks of being on a DESIGN TEAM!!  Here is a digital page I made with this kit.

Later this week I will show you some HYBRID projects made with the same kit!  But for now…what do you think?


Can you tell made the little banner from pieces of the paper from the kit.  Another trick I learned on the JESSICA SPRAGUE website!  So today’s giveaway is for all who request.

It is the Word Art I created for this page that says “SLEEPING BEAUTY.”


Here is an example of what it looks like with a background paper(not included) in the back.

Just leave a comment that you’d like to have the MONDAY FREEBIE and it is yours, for personal use only.  This will remain free through this FRIDAY, October 22, 2010.  After Friday, I will put it in my ETSY store!

It is in a .png format and you will need a background paper, other than white for the sparklies to show up!

Have a great day and look for another post from me later today!