Archive | Tutorial RSS feed for this section

Promised Rainbow Flower Tutorial

27 Jan
Hello everyone in the bloggy world.
 This is Jeannie from The Polka Cabana with yet another FLOWER tutorial for you!
Last week I had such a nice response to my rainbow flowers and quite a few of you said YES to my offer for a tutorial, so that is what I am going to share with you today.
I use inexpensive tissue paper for these flowers.
The first thing I do is to cut strips long enough to fit the CUTIES #4 die on.  I make them wide enough to cut 2 times from the paper. The stack is cut from the unfolded pack of paper.  I use the whole thickness (30 sheets deep) for the flowers.
Here is my big secret…my dye!  I’d love to use some sort of expensive dye, but I am a struggling artist after all and can’t afford something like that.  I had this idea to take Kool-Aid packets and mix with a little bit of water and rubbing alcohol to make my own die.  Here you can see the bottles all mixed and lined up ready to go.
I have the papers on top of a cookie rack, which is on top of a cookie sheet, to catch any drips that might occur. I like to try to do 2 complete ROYGBIV patterns on the tissue paper.
Here you can see I have gotten all the dye on the paper, now they need to dry.  I put the, in the oven at 170 degrees for about 20 min.  But, I do not endorse this as I know paper in the oven…sounds risky!
Here the strips are all dry.
After I cut all my cuties, I like to stitch them to keep them together. ( I lengthen the stitch to make sure the machine does not destroy the flowers,)
When putting these together, whether you choose to stitch them like me, or glue them, it is imperative to have the petals of the 2 die cut strips lined up so that the bottom layer of petals show up in the gap of the petals in the top layer.  Below is a close up of what I am trying to say.
To assemble the flowers, I use these sticks that are about the size of toothpicks, without the pointy ends.
Apply hot glue to the tip of one of the sticks and roll the beginning of the flower around the stick…
…and hold there until the glue is dry.
Then just roll the flower up and secure with another drop of hot glue.
Next, cut the stick very as close as you can get to the base of the flower.
On a circle about 5/8 wide, have a big dollop of hot glue waiting and…
…glue the flowers to the circle.
After the glue is dry, I take a very soft toothbrush to fluff and separate the tissue paper layers.
Here they are all fluffed up.
When using these types of flowers, I like to have a nice crisp white background.
 I have only used the Cuties #4 flowers and the Dancing Doily Lace Border.
They make such a colorful presentation.
So, there you have it!  I kept my word and divulged my secret!
I hope you have enjoyed my post today.
Be sure to check out our current Challenge.  This week our theme is
DRY EMBOSSING.
You can get all the details here.
I am off to pack, heading to Southern California for CHA!
 I am so excited to be there with Cheery Lynn Designs.
This has been Jeannie from The Polka Cabana with today’s post.

“Scents” able Card Making!!

18 Jan
I have a FUN idea to pass along to you today!
My next 2 days of cards are dedicated and made with a special friend in mind!  Dearest Michelle, I hope I make you smile!
Did you catch the clue in my title?  SCENTS able?
I am going to show you how to make a yummy smelling card!
Start with some basic supplies.  Here I have my embossing pad, my Cherry Stamp from the NEW SEASON, NEW WONDER set and some Kool-aid mix and my brand new CABLE CAR RED embossing powder from WOW EMBOSSING POWDERS.
First, mix a little of the Kool-aid powder with the embossing powder.  After you mix the 2 real good, you use the scented powder just like any other embossing powder.  You can smell it while you heat it up and the scent stays after it has embossed and dried!
I have a lot of these little empty plastic jars, so I saved the excess to use later.
I have used lots of Sassafrass fun papers and embellishments to go along with this card.
The large cherry stamp, the background on the navy blue strip and the word SWEET are all done in the scented powder.  It smells so fruity!  YUMMY!!
Here is the side view, now isn’t this a cheerful card??
Thank you for stopping by, I hope you have enjoyed this little tutorial!  If you use my idea, I’d love for you to link back to this post!
That is my WOW for today!  Have a great Wednesday!  See you next week!
This has been Jeannie from THE POLKA CABANA with today’s post!

Holiday gift and Decor with Authentique Paper

28 Nov
I have a fun and easy idea to pass on to you today.
I am using some paper from the Wonder 6 x 6 bundle and a plain glass frame.
To start off I cut a frame from a full size piece of Wonder’s, off-white foundation paper.
The frame measures 5″ x 7″.
You can see all the shapes that have been cut out on the left.
I took each paper and put the right side of my cut out to the wrong side of the patterned paper I was using. This is so I do not get pencil marks left over from tracing.
You can see here that I was careful to number and match each patterned paper piece to the pattern piece I was using.
All the pieces are cut out, it is time to get ready for assembly.
Using a paint dabber, I edged all my cut outs and also the frame.
I also took the frame base and edged that with the paint as well.
I covered the frame back with a neutral piece of cardstock to cover the frame clamp holes.
Next I adhered the frame.
I knew I wanted to have the cut outs be slightly raised, so I put dimensional foam down first.
 Here is the first stage of the frame done.
Next, I took some vinyl and cut-out the word JOY.  I used a setting on my cutter that cuts through the vinyl, but not the vinyl backing.  Here you see that I have already cut and removed the excess vinyl and only the word JOY is on the backing.
This might be redundant for those who work with vinyl, but after I did the previous step, I took some mounting film and lifted the word off the vinyl backing.
What you see here is the vinyl attached to the mounting film. the sticky side of the film is on the back of the letters.  The mounting film will release the vinyl, once I attach the vinyl to the frame.
Here I have attached the word to the glass and I am peeling off my mounting film.
Step 2 , you can see below is all done.
Step 3 is optional.  What I did was to embellish the from of the glass further.
I added fibers, lace and beads to bring it all together.
It really is a beautiful piece and fairly easy and quick to make.
You could use this idea for any season or for any occasion based on what paper you use.
I hope you have enjoyed this tutorial and that you can use this idea for the upcoming holiday season.
This has been Jeannie from The Polka Cabana with today’s post.
Supplies used:
Wonder full sized Foundations
Wonder 6 x 6 Bundle
Stampin’ Up! Pretties Kit (no longer available)
Frame .svg – My Crafty Files
Misc trims and fibers.

Extreme Paper Crafting with Authentique Paper and Glue Arts

18 Oct
If you are here for my Sweet Stamps post, click HERE.
Hello all you paper aficionados!
I really am excited to show you what my wild imagination has come up with today.
I am very grateful to Glue Arts for their part in this post.  Without certain products of theirs, this project could have been a disaster.
Here is what I started with for this project.
A bunch of Glowing scraps, polka dot fabric and a made up pattern piece(the white paper.)
The first step is to cut out a bunch of the pattern shapes from the scraps.
Using a machine, sew all pieces together using a 1/4″ seam.
Here is what the pieces look like after they have been sewn together.  Note: all pieces are sewn, right sides together.
Those of you that sew, know that clipping curves can really help when creating curves, this picture shows you what clipping curves looks like.
After the seams are all clipped, turn the piece right side out.
Using my Glue Glider Pro with Perma Tac adhesive, I attached some glowing paper to 1″ chipboard circles. These will become a base on the inside and outside bottoms.
Take a strong thread, I use upholstery thread, and gather the bottom tightly to close.
Take one of the chipboard circles and place it inside the piece.  This is used to help shape the piece and gives a flat surface to put some weights(beans) on top of.
I have my beans wrapped in plastic, just to keep them intact.
On top of the beans, start putting the stuffing in the piece.  Stuff and gather until you are happy with the shape. Gather the top closed in the same manner as the bottom.
To conceal the gathered top, I created lot of different tops using scraps and Glue Arts Raisen’s.
For some of the tops I gathered strips of paper.
I connected the strip with the Perma Tac.
Using the Raisen’s, I inserted a twig in the opening and tightened the gather strip and adhered it to the top with the Raisen’s.
Some of the tops, I made loose Yo-Yo’s to conceal the openings.
The Perma Tac was instrumental for these.  I adhered the fabric to a piece of plain white paper, before die cutting the fabric.
Perfect cuts, thank to the paper staying adhered to the fabric.
Thank you GLUE ARTS!
Here are the Yo-Yo’s adhered to the tops of these.
Lastly, I took some acorns and acorn tops and some scraps.
Using the Raisen’s again, I adhered the paper to the acorn pieces.
I then gathered an finished these off in the same manner as the items above.
In case you couldn’t guess what I was making, here they all are.
My pumpkins.
I win the mom of the year award for these.
My big kids could not believe they were made out of paper.
My little ones could not get over the cuteness because they are so small.
These make such an eye catching display.
To get an idea how small some of them are, here is my 4 year old, holding her 2 favorite pumpkin babies.
They could almost double as earrings…
 …earrings?  Hmmm….do I dare??
Obviously, these will not be kept outside with the real pumpkins, the overnight moisture would destroy them.
But they sure do look good with the Real thing!
I decided to put them on a plate and display them like this.
One last peek.
 I wouldn’t dare mix with fabric and paper unless the paper is Authentique Paper.
 I am starting to think of all the possibilities of things I can make now that I know I can use Authentique Paper in many of the same ways I use fabric.
Be sure to keep visiting us here on the Authentique Paper Blog to see what all of on the Design Team come up with.
Thank you again to Glue Arts for allowing me to work with their awesome adhesives for this project.
This has been Jeannie with The Polka Cabana with today’s post.
Supplies:
Polka Dot Fabric
Twigs
Glue Gun
Cotton Balls

New Authentique Paper Sketch Challenges

1 Oct

Have you gotten your hands on some Authentique Paper yet?

Do you like to win free stuff?

Do you like to use sketches?

Well…get on over to Authentique Paper’s blog and join us in our latest challenge.

Here are the 2 sketches.

CARD:

PAGE LAYOUT:

Here is the page I have created:)

Did you catch my post the other day about Authentique Paper’s secret?

https://polkacabana.wordpress.com/2011/09/25/authentique-paper-secret-qualities/

On this layout, I have used the same technique.

I came up with this idea, because I love both sides of double sided paper and am sad to only use 1 side of the paper.

Here you can see I have already seperated the paper I wanted to use..Yep, I separated a whole 12 x 12 sheet of paper.

The blue is just plain cardstock and the yellow is a piece of old DP that I will not use, it in only being used as my “CANVAS”.

I have already made the base of my page.  I made the paper ruffle down the middle with strips of separated papers from the GLOWING line.

Now I am focusing on the TITLE for the layout. Using one of the HEADLINES from SPLENDID, I used the same process and separated the 2 sides of the HEADLINES from each other.

Here is a close up. Can you see how cotton/fabric like the inside of the paper is?

Here I have all the pieces ready to assemble.  I am building the title on scraps left over from the HEADLINES piece.

Here I have gathered my ruffle and sewn it to the back of a scrap that I pre measured to the length I wanted.

This is the BACK side.

Here is the RIGHT side all stitched up and ready for the rest of the title.

I used this ruffle technique in different places on my page.

I love the extra shabby/worn look the paper gets when it is separated.

All of the main pieces on this page are just 1 layer of the double sided papers.

I used some of the icons to make the custom EPOXY buttons.

I think they add such a nice touch.

 Have to have some Authentique rolled flowers, right?

All in all, I really like the way this page turned out.

 It will be a page I treasure for a long time.

 Here is one last peek.

 I would love for you to join the challenge.  You can do either a card or scrapbook page.  You do not have to own Authentique Products to participate, we would encourage you too, but it is not mandatory.

At this time the prizes can only be shipped to US or CAN.

But the key word here is PRIZE!

You can win some of this fabulous paper to have all to yourself.

Go over to the blog and get inspired by our creative DT and join along!

http://authentiquepaper.blogspot.com/2011/10/october-sketch-challenge.html

Come back and leave a comment if you enter so I can see what you made!

For now..Happy Saturday and Happy World Card Making Day!

Now, go make something!  I give you permission.

Authentique Paper “Secret Qualities”

25 Sep
I am so excited to post this tutorial her today.
I am working with the new line of papers called FREE BIRD.
These are 6 x 6 papers that will be sold individually and what is so awesome about them is that they are the same quality as the bigger Authentique Paper 12 x 12 sheets, textured and wonderful!
The buss with the Authentique Paper Design Team right now is that we all love the designs and the papers in this new FREE BIRD series, we almost do not want to use them.
If you are a true paper junkie like me as much as I love double sided paper, it can sometimes cause anxiety in me.  I look at both sides and think, I can’t possibly use ONE side and not the other.  How do you choose which side to use?  I want BOTH.  Today I am sharing one of my BEST KEPT secrets with you.  The textured papers that Authentique Paper produces are such high quality, durable and strong papers you can literally separate the double sided papers into 2 pieces of paper.
Yes…2 completely separate pieces!!
First you are going to need to break down…break down…break down the fibers in the paper.
To do this, I started by putting the sheets of paper through my crimper, over and over again.  About 3o times at least.  After that I just kept bunching it and crumpling it by hand.
It is important to note, I did not wet the paper in any way at all.
When I start seeing the edges are separating, I know I can start taking the pieces apart.
At first I used a spatula to carefully hold the one side down while I tugged on the other side.
But after doing this a couple of times, I found the easiest way is just to very gently separate a small section, rotate, tug, rotate and keep doing this until the pieces are free from each other.
You will end up with 2 intact pieces of paper you can play with.
The other side looks like a fuzzy white piece of cotton.
Here are some other pieces of the FREE BIRD series I have already separated and have cut them in strips.
I uses a small dress form die cut from chipboard as my base.  You can use this single layer of paper almost like it is fabric.  The paper at this point is as flexible as a piece of fabric.  Really!
Here I have made the bodice piece for my tiny dress.
Then I made the ruffles for the skirt.
Here are the pieces all ready to be assembled.
Using hot glue and some imagination, this is how the dress turned out.
I had made a focal point for my card, but it did not show up well as I used the same shades of green for my card base and embellishment, so I decided to make a ruffle to frame my circle embellishment.
I just attached a bunch of strips, end to end and gathered them to make the ruffle you see in this next picture.
The neat thing is, after making this card, I still have pieces left.
Isn’t that awesome?
Who knew you could pretend paper was fabric and sew a dress out of it?(Other than me!)
My point in sharing this is to show you Authentique Paper‘s:
DURABILITY
FUNCTIONALITY
VERSATILITY
POSSIBILITIES, which are endless.
I hope you have enjoyed this tutorial.  Think of how many fun projects you can make with this fun paper and if you use my technique, you can double the amount of projects you make!
Have fun and happy paper crumpling!!!  This has been Jeannie with The Polka Cabana with today’s post.
Products Used:

Authentique Paper, where have you been my whole life?

9 Aug

Yes it is true, I have been a little on the AUTHENTIQUE PAPER soapbox lately!

If you have not tried their products, then you really do not know why I am so honored to be working with their products!

Genius is not too small of a word for some of their things!

A couple of reasons why I love Authentique Paper so much:

Quality – Sturdy and thicker that most paper, the prints are just fabulous and there are many palettes to choose from!

Design – I love that there is such a wide range within each line.

Products – My favorite has to be the Diction!  You know the little poetry magnets that you can buy?

Well these are similar, minus the poetry and minus the magnet but heavy on the miscellaneous words you can use on everything!

Here is what they look like:

You get all those word on this sturdy cardstock type sticker and there are so many different projects you can use these on!

I wanted to let you know of a tutorial I have done for Authentique Paper on 3 different cards using my favorite line called SPLENDID.

Here is a peak at the cards:

Card #1

Card #2

Card #3

All 3 together.

If you would like (and I hope you do) to see the whole tutorial, here is the link.

http://www.authentiquepaper.com/?page_id=12

Leave a comment here and there and I will tally up all comments and choose a winner to win one of these!

 Winner gets to choose which one!

Once again here is the link:

http://www.authentiquepaper.com/?page_id=12

Be sure to leave a comment in both places, let Authentique Paper know that Jeannie sent you over!

Let me know what you think and have a great day!!

Love to you all!!!!!

Ladybug Princess set with Cheery Lynn Designs.

29 Jul
Aren’t these cute? I got them on sale for $1.00. It was meant to be because my princesses flip flops broke and these are their replacement.
Not fit for a princess how they are, so let me show you how to jazz them up!

I used some glitter fun foam and the WITTLE WICKER die.

By cutting the fun foam with the WITTLE WICKER die, I get perfect 1/4 inch strips.

Next I took my red and black glitter fun foam and cut ladybugs
out from the LADYBUG FRAME die.

Here the pieces are ready to assemble.

Next I took a piece of fabric and ripped it in about 1/2″ wide by 5″ long strips.

Here is a nice pile of strips ready for the next step.

I took them one at at time and tied them on to the flip flop straps.

Finished with the tying.

Now with my white glitter foam 1/4″ strips, I accidentally bought sticky back foam, so I stuck all my strips with a matching “buddy”.

After I stuck all the sticky sides together, I cut the strips in half. They are about 1 inch long here. I covered a button with fun foam as a base. I them glued all the strips in a spiral fashion on the fun foam covered button.

I then cut a yellow flower out from the SWEET WILLIAM die.

I glued the SWEET WILLIAM to the top and trimmed and cut the white fun foam until I liked the shape of the flower.

I assembled and glued on the ladybugs and added some dimensional spots with a BLACK VIVA DECOR PEARL PEN.

Here are the flip flops all done.

Awww, look at those spots!

Next, I made a matching headband.

Using the same technique and design as the flip flops, I tied some fabric onto the headband.

Here is the finished headband.

Might as well make a bracelet to go along, right?

Look at those flip flops, I love how they turned out!

Here is the full ensemble.


Now we are just showing off!


You can tell she really LOVES her new things! The whole set cost between $5 and $8 to make. Not too bad, right?
I hope you have enjoyed my set fit for a princess, this has been Jeannie from The Polka Cabana with Friday Fun!
Dies used today:

Friday Fun with Cheery Lynn Designs and Grafix Arts

21 Jul
Today I am going to give you a mini tutorial.
Very mini as I will show you the 1st couple of steps and
then you get to do your own thing past what I share.
I saw this done by
Rhonna Farrer, she calls them Lollipops.
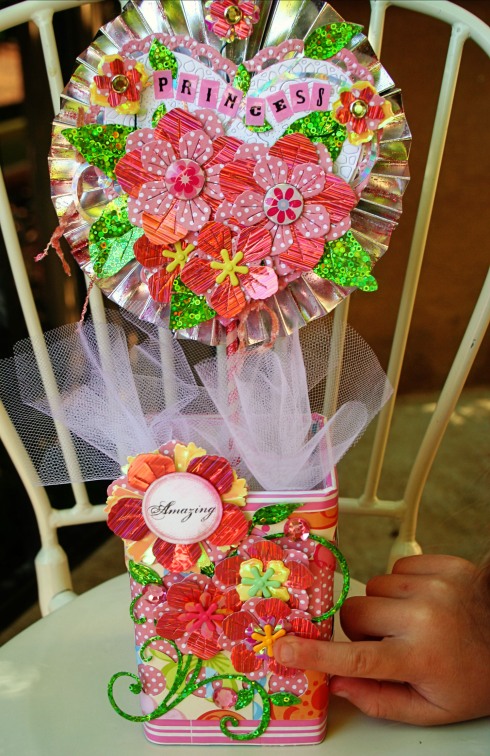
Mine are called CUTE FLOWER ON A STICK!
I am so creative, I just can’t help it!
What makes mine unique is that mine are made with some really fun papers from Grafix Art called:
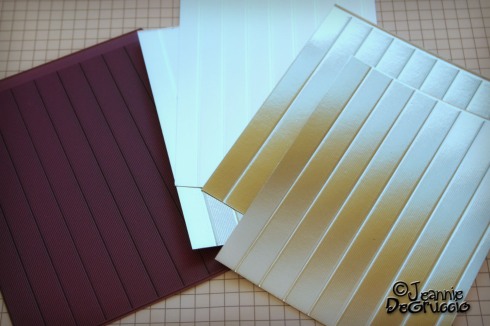
To start the CUTE FLOWER ON A STICK project, you will need some paper cut into 4 x 5 inches. I used 4 pieces of the SILVER METALLIC BOARD.
I also used my Wittle Weaver 1/2″ strip die with the Thin Embossing Pad.

By using the embossing pad, this embosses perfectly measures fold marks for these flowers.
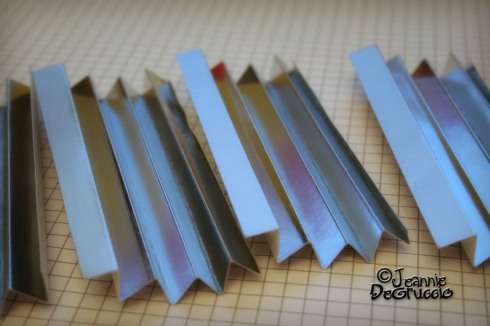
First step, you guessed it, do the accordion fold with all 4 pieces of paper.

Next, fold each accordion in half.
Glue the center seam of each piece to create these fan shapes.

Next glue all four fans together and look a Jello mold!!
Now from here you can do whatever you want, however,
I do not recommend pouring Jello into it!

I used so many dies on this, where do I begin?

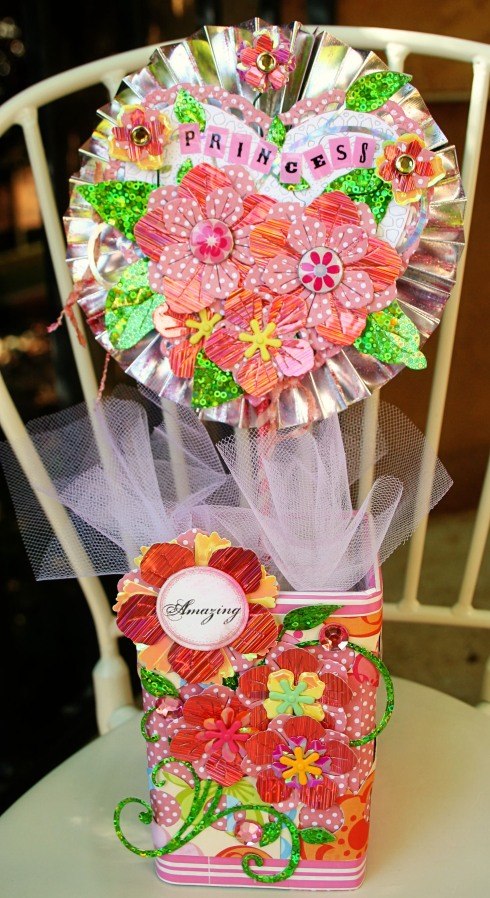
After I got the Silver Flower Base all formed, I started by putting a white HEARTLAND AMERICANA Heart down and then trimmed the white heart with the Polka Dot Pink paper.

After that I used the FANCIFUL FLOURISH and cut it out with the sparkly green FUNKY FILM.


I used an assortment of papers and more sparkly FUNKY FILM that is pinkish peach with the JUDY’S BLOOM die.

I got this cute little box from my local Ben Franklin Craft store. They have these bins that are full of $1.00 items and this little box (originally blue) was one of my finds in the dollar bins.

I covered the box with matching paper and FUNKY FILM flowers. I poured rice in a baggie and made some tulle puffs to disguise the rice.

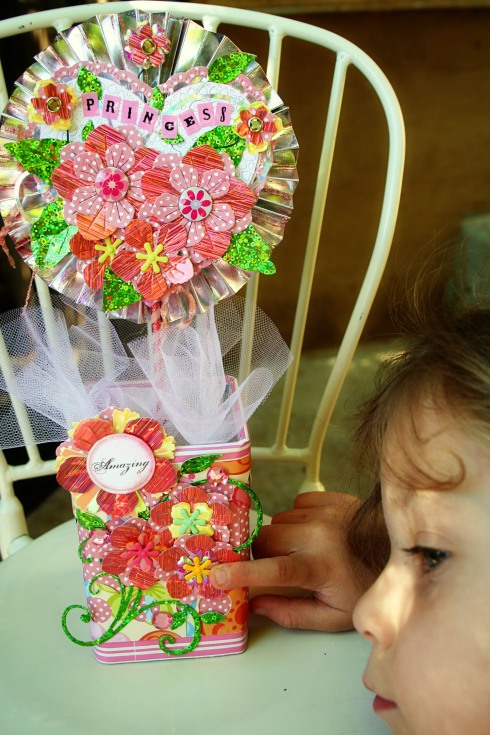
I then stuck my CUTE FLOWER ON A STICK in the rice and created this adorable centerpiece.

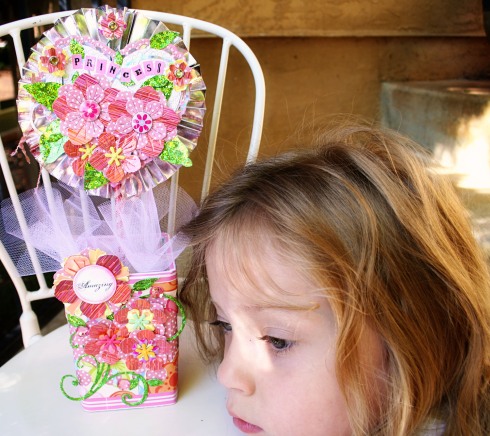
Wouldn’t this be fantastic as a centerpiece for a little princess?
My princess thinks so!
Have a great weekend, be sure to visit us and see what the other Design Team members are up to!
This has been Jeannie with THE POLKA CABANA with your Friday Fun!
Cheery Lynn dies & products used in today’s project:

Cheery Lynn Designs, Jewelry?

20 May
You read that title right. Today I am going to show you some simple jewelry and accessories I made with my Oriental Butterfly Doily.
The first step in today’s project was to cut my butterflies out. I cut them out on, Grafix Art Black Shrink film. The film is very thick and strong. Since the doily is very detailed, I chose which holes to punch all the way out. I made sure the butterfly wings were a symmetrical pattern.
Here they are before I started punching out the holes I wanted.

Here they are after I have punched out all the openings I wanted.

With 2 of the completed and cooked butterflies, I made 2 matching hair clips.

I accented them with some rhinestones and they are nice a sparkly for the official FAIRY of the house. The “Magic Fairy Princess” really loves these.

With the remaining butterfly, I made a simple necklace.
This is a jewelry finding meant for cording or ribbon.
That triangle you see pointing up, pierces through the ribbon and holds it in place while you crimp the bead closed.

You can see that there are 2 flaps/sides to this crimping bead.
You take your ribbon and fold it over itself and center it on the sharp middle of the bead.

Once the ribbon in enveloped in the center you crimp one side closed.

Making sure that you are entirely encasing the ribbon, you crimp the other side closed.

Here I am adding some beads and jump rings to center of the necklace, the butterfly.

I attached the ribbon to the butterfly, added a clasp and here is the finished set.

These are very easy to make and a great last minute gift.

To give you an idea of how much the Shrink Film, shrunk, here is a picture of the hair clips with the Oriental Butterfly Doily die.

Here is the PRINCESS with her new bling.

The butterflies are the perfect shape for these hair clips.

The whole ensemble.

Now that I have made these, I have a ton of ideas for the future.

Earrings, bracelets, bookmarks, oh my! I can think of a ton of things I can’t wait to try!

I hope you enjoyed my “NOT PAPER” project today.
Thanks for stopping by and please join us on Sunday for our Butterfly Challenge kickoff!
This has been Jeannie from The Polka Cabana with your Cheery Lynn Designs Butterfly accessories.
Items used in today’s project: